Home -> Articles -> Photoshop Techniques for Photographers
Photoshop Techniques for Photographers
written by Greg Cope
I often equate using Photoshop on digital images to the process of developing photographic film - when shooting film, the film itself contains certain properties which must be developed to become usable as an image. An analogy could be made to digital camera photography, either in camera (when shooting jpg's) or in post-processing (when shooting RAW) the pixels captured by the sensor of the camera should be developed into the final photographic image. Over the years, I have tried several dozens of trivial to complex Photoshop techniques, plugins, and tools for my photos - with varying degrees of success. Below I outline some of the Photoshop tools and techniques I have found work best for how I wish to develop my images. Note that these tools are more advanced Photoshop and image processing tools requiring a basic knowledge of Photoshop of similar software.
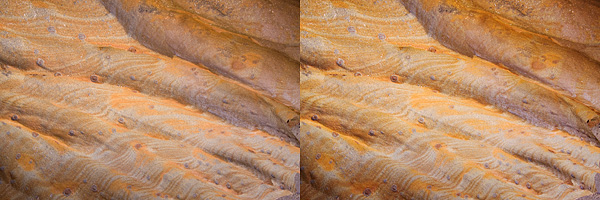
Luminosity Masks - Luminosity Masks, first described by Tony Kuyper, provide detailed control over contrast, saturation, and color tone within various windows of luminosity. The technique involves creating several masks representing different levels of luminosity - for instance brights, darks, or midtones - from which adjustment layers can be created to adjust a variety of factors. Changes to the values of each layer changes only the pixels within each luminosity window - thus one can dial up dark areas, dial down bright areas, increase contrast in midtones, or a variety of other changes. The changes are often seen as subtle but in my opinion make photos 'pop' a lot more more. The example below illustrates a before and after example using Luminosity Masks - I will let Tony's tutorial speak for itself when it comes to more details and examples.

On the left is before luminosity masks, on the right is after. Often subtle but powerful, for demonstration I pushed the effects in this example harder than usual.
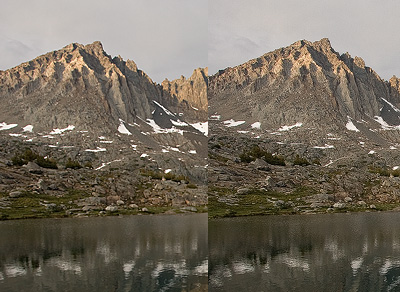
Sharpening for the Internet - The first I heard about this technique was from an online article written by Marc Adamus. This technique invloves creating sharpened edges with extremely fine texture, seemingly more detailed than a simple sharpening pass provides alone. The technique invloves reducing the image size to approximately double that of the final web size. As an example, if you wish to have a 650 pixel image along the longest dimension, reduce to approximately 1300 pixels along the longest dimension. Depending upon the amount of sharpening needed, run the image through Photoshop's 'Sharpen' tool 2 times - sometimes less, sometimes more depending on the amount of sharpening desired. Afterwards, reduce the image to the desired size. As increased sharpening can cause color shifts, it is best to do this in a new layer, setting its blend mode to luminosity. The result is an image I have found to be more detailed and textured than the alternatite.

Left: Sharpened using photoshops Unsharpen Mask. Right: Sharpened using the above technique.
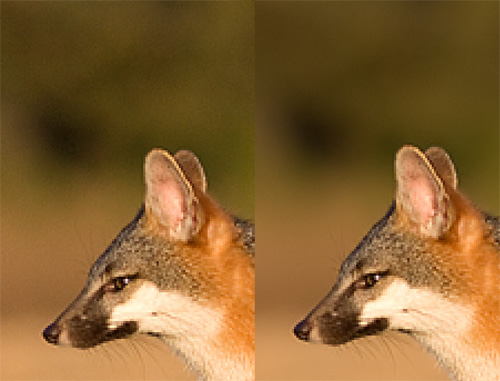
Neat Image - Both digital and film images are typically accompanied with noise, especially in mono-color areas of an image. Neat Image is by far one of the best tools I have found to deal with unwanted noise. While this tool is not for blurring otherwise busy backgrounds to make a subject stand out - say in wildlife photography - it is extremely useful in removing artifacts such as grain, posterization, and banding. The plugin is easy to use, readily removes unwanted noise while maintaining edge sharpness, and is especially useful in photos with large out of focus areas.

Photo of a Gray Fox blown up to %400 to demonstrate detail. Both images are identical aside from a pass through neat-image (right).
PixelGenius - Pixelgenius provides the Photokit Sharpener plugin for Photoshop. I was at first reluctant to give the sharpener a try. However, with an upcoming exhibition I was looking for optimal methods to sharpen my photos in print. Several series of trials using different sharpening techniques and I was convinced of Photokit sharpener's capability. I will note that I have used these plugins mainly for print, and I have found their affects get more evident the larger the print. My experience has been that the web sharpening described above is better relative to the Photokit web sharpener.
~~~
Comments - No photoshop tool can replace that of a solid, well composed photo. But on the other side of the spectrum, photos with great light and exceptional composition can be sub-optimal without proper development. None of these techniques alone or together should replace a solid knowledge of contrast, saturation, sharpening, and other basic image processing techniques. That being said these tools can help push a basic understanding of image processing to the next level.
Useful Links